Setting Up Email Authentication: SPF, DMARC, and DKIM Explained
Introduction:
In today’s digital world, ensuring the authenticity of your emails is crucial. Authentication using SPF (Sender Policy Framework), DMARC (Domain-based Message Authentication, Reporting, and Conformance), and DKIM (DomainKeys Identified Mail) is essential to prevent your emails from being marked as spam. This guide will walk you through the steps to properly set up these authentication methods.
Understanding the Basics:
- SPF allows senders to define which IP addresses are allowed to send mail for a particular domain. Other IP addresses trying to send are rejected.
- DKIM provides a way to digitally sign the contents of each message. This ensures your message is not tampered with in any way before it reaches its recipient (for example, no one can sneakily replace the links in the email with malware ones and then pass it off to the end recipient)
- DMARC ties the first two together with a consistent set of policies and reporting. You decide what to do with emails that do not pass the checks, and provide an address whereby you can be notified of problems.
All three of these are published in your DNS records, and they work together as each message arrives at your email provider.
For each single message, your provider looks up the From: domain, and then checks SPF and DKIM to see if the message looks authorized (from the allowed IP) and signed (nobody has tampered with it since it was sent). If there is a problem with either, then your DMARC policy decides what will happen (bounce it? spam box it? deliver it anyway? And who to report problems to).
Starting in February 2024, Google will no longer accept any bulk mail from domains that do not have all three of these technologies in place.
Step 1: Identify All Email Sources
You must identify all sources that send emails on behalf of your domain, such as Google Workspace, Microsoft 365, Mailchimp, Quickbooks, etc.
You will need to check each provider in turn, and ensure each of them is working properly with both SPF and DKIM before moving on.
For DKIM – you are going to be adding a public key to DNS for each service. These are TXT records and named keyname._domainkey.example.com . The “keyname” changes with each provider.
For SPF – the provider will give you a SPF string to set for your domain. But, you can only have one SPF per domain which means you are going to need to combine all of the SPF’s for all of the different services. Please see the links at the bottom of this page for more information on how to combine SPF records.
Danger: Do NOT add your DMARC record until the end, after you’ve fixed SPF/DKIM for each of the places that send mail from your domain, or it may cause bad delivery problems!
Step 2: Check Your Email Configuration and gather DNS records for each provider
- Website Configuration: Verify your website’s email setup and examine the headers to ensure proper SPF/DKIM alignment. The easiest way to get your website to email you is to do a password reset process. The website will then send you a password reset link. Instead of following that, view the message’s raw source / raw message headers, then check to see if it is authenticated by SPF and DKIM.
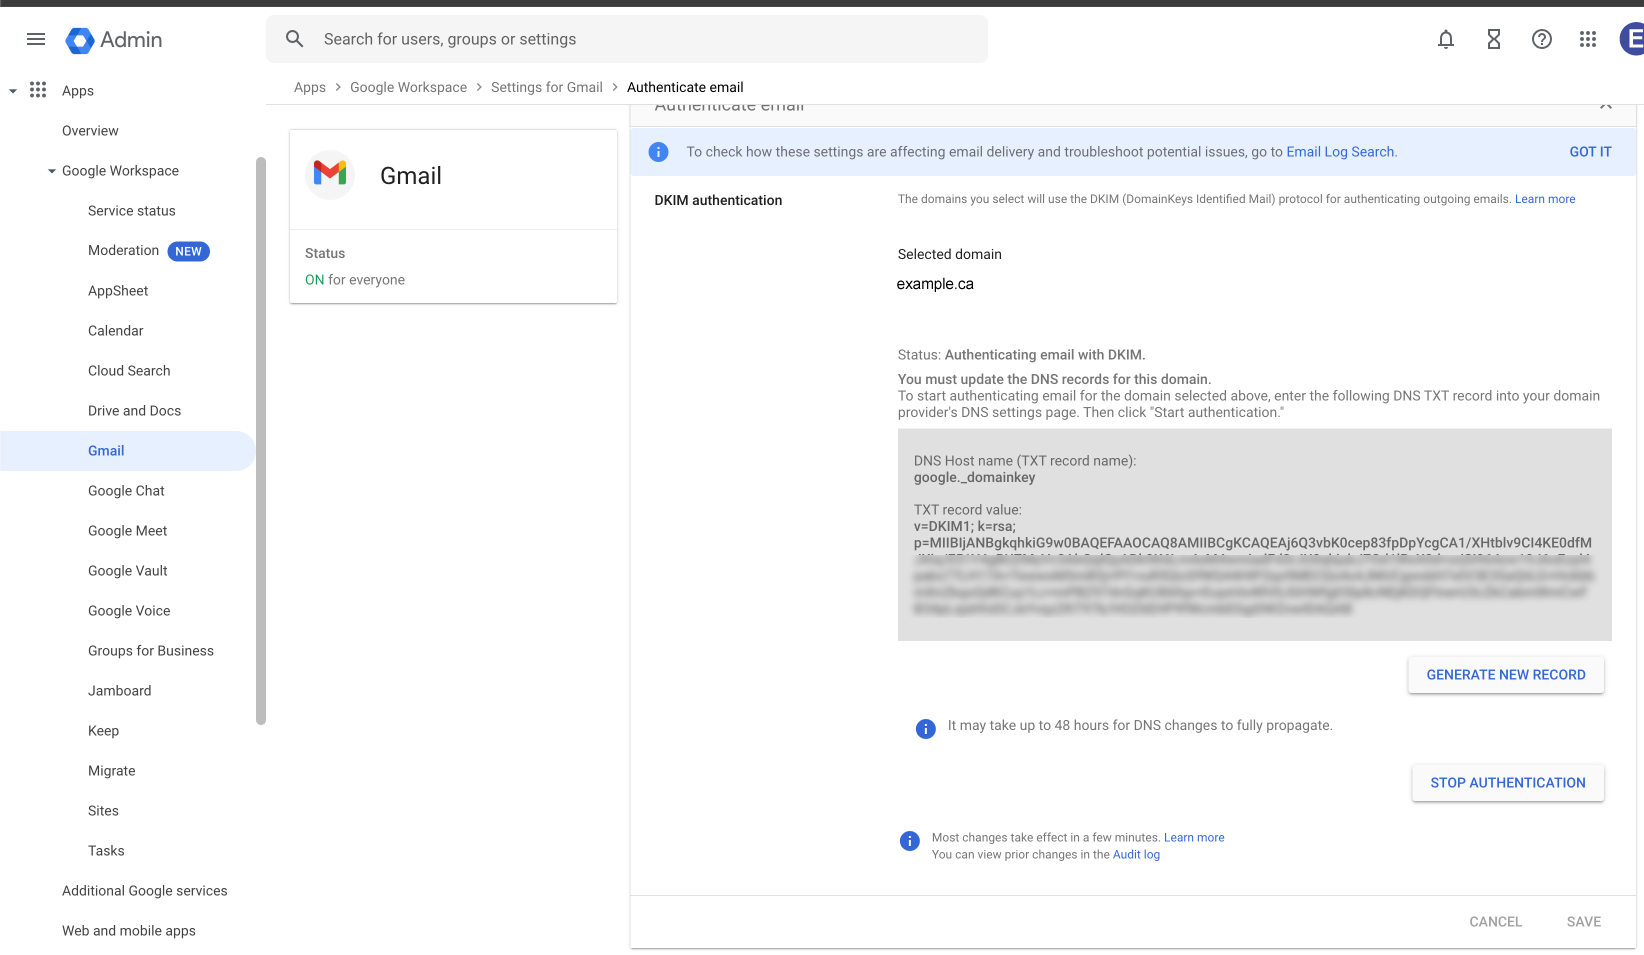
- Mail Provider Setup: Confirm that your email providers like Google Workspace or Microsoft 365 are setup properly for “Email Authentication”, (ie. you added a DKIM key for them to your DNS domain as a TXT record).
You can utilize web tools like MXToolbox to diagnose and identify what you might be missing and test your SPF and DMARC records.
Links to instructions on the specific DNS records for common services are below:
For Microsoft 365 Users:
- SPF: Microsoft’s SPF Configuration Guide
- DKIM: Microsoft’s DKIM Configuration Guide
- DMARC: Microsoft’s DMARC Configuration Guide
For Google Workspace Users:
- Comprehensive Guide: SPF, DKIM, and DMARC Setup for G Suite
Note that you need to combine the contents of the SPF records from all your different services to come up with a complete record that covers everything. You cannot have more than one SPF record, or it will be invalid and will not work!
Docs on how to merge SPF records: https://wpmailsmtp.com/fix-multiple-spf-records/ or https://www.mailerlite.com/help/how-to-merge-spf-records
It is essential that you test your SPF record is working and has valid syntax after you’re done. Use the tool at MXToolbox or check email headers to see.
Step 3: Setting Up DNS Records
Once you have gathered the necessary DNS records and have created your combined SPF record, you will need to add them to your domain’s DNS records. This is done at your DNS provider, which may be different from where you registered the domain. (For instance you may be registered at GoDaddy but have your DNS servers at Cloudflare, if you are using Cloudflare CDN).
To tell where your DNS server is located, you can look up your domain with a “whois” tool (or the ‘whois’ command line command). The end of the WHOIS output for your domain will show your Nameservers, which usually gives a hint as to where you need to go login to make changes.
Log into the control panel for your DNS and add the records from Step 2.
Step 4: Implementing DMARC
Once you have verified the DKIM and SPF for Google, Microsoft 365, your website, and all your other sending platforms, the final step is to add the DMARC record to your domain’s DNS.
Ensure that no other sources send emails on your behalf that have not been accounted for (such as Mailchimp or Quickbooks). Adding the DMARC will cause problems if everything else isn’t setup right!
DMARC records are type TXT and found at: _dmarc.yourdomain.com
The most basic DMARC policy you can have is: _dmarc.example.com TXT “v=DMARC1; p=none” This says “do nothing and don’t bother me”. Your mails will lose some spam reputation score when being filtered if you use this setting, but it won’t cause bounces.
The best DMARC policy you can have is: _dmarc.example.com TXT “v=DMARC1; p=quarantine; rua=youremail@example.com” this says “put any failing messages into the spam mailbox, and email me at youremail@example.com so I can address the problem if it’s something I can fix”. Mail servers love seeing this and will treat your mails as more trustworthy as a result.
Having a strong DMARC policy will help your emails get through, because Google and Microsoft will treat you as the model Internet citizen you have now become by doing all this work.
Additional Tips:
- Understanding DMARC Policy: Choose between ‘none’, ‘quarantine’, and ‘reject’ based on your security needs. ‘None’ is often used for monitoring and transitioning to a more restrictive policy.
- Regular Reviews: Periodically review and update your SPF, DKIM, and DMARC records, especially when changes occur in your email sending services.
- Adjust when adding new services: Don’t forget that any new service you send email through must be setup for SPF and DKIM, or it will cause problems! Luckily if you forget you should get a reporting email (because you did set a strong DMARC policy with a reporting email didn’t you?)
Conclusion:
Setting up SPF, DKIM, and DMARC is vital for email authenticity and domain reputation. By following these steps, you can ensure your emails reach their intended recipients and maintain your domain’s credibility.
Further Resources:
For more in-depth understanding and troubleshooting, refer to SenderScore and Postmaster Tools by Google.
See Below for some examples of DNS records, DKIM, and DMARC:
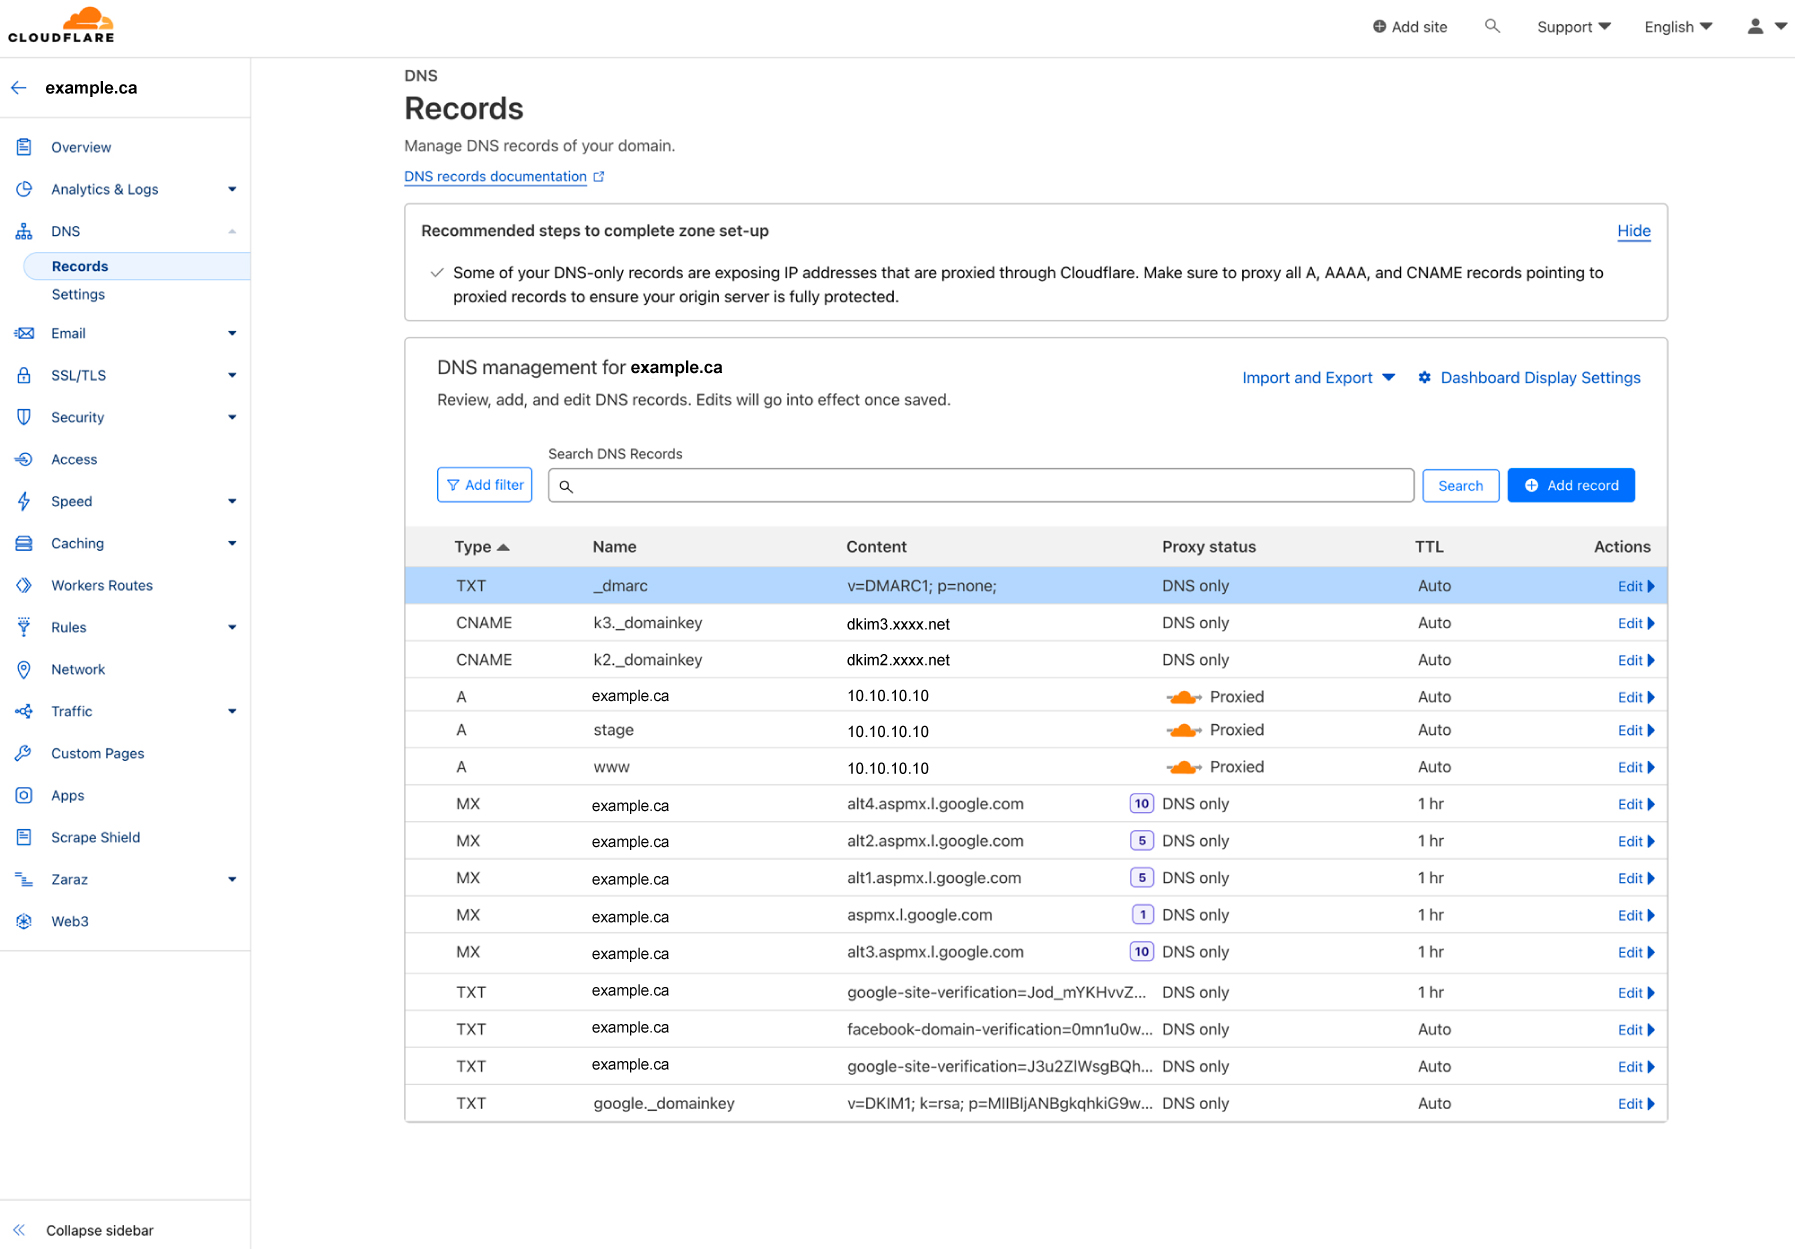
DNS Record Sample
*this can be at GoDaddy or any other DNS hosting
Cloudflare Example
Google DKIM Example
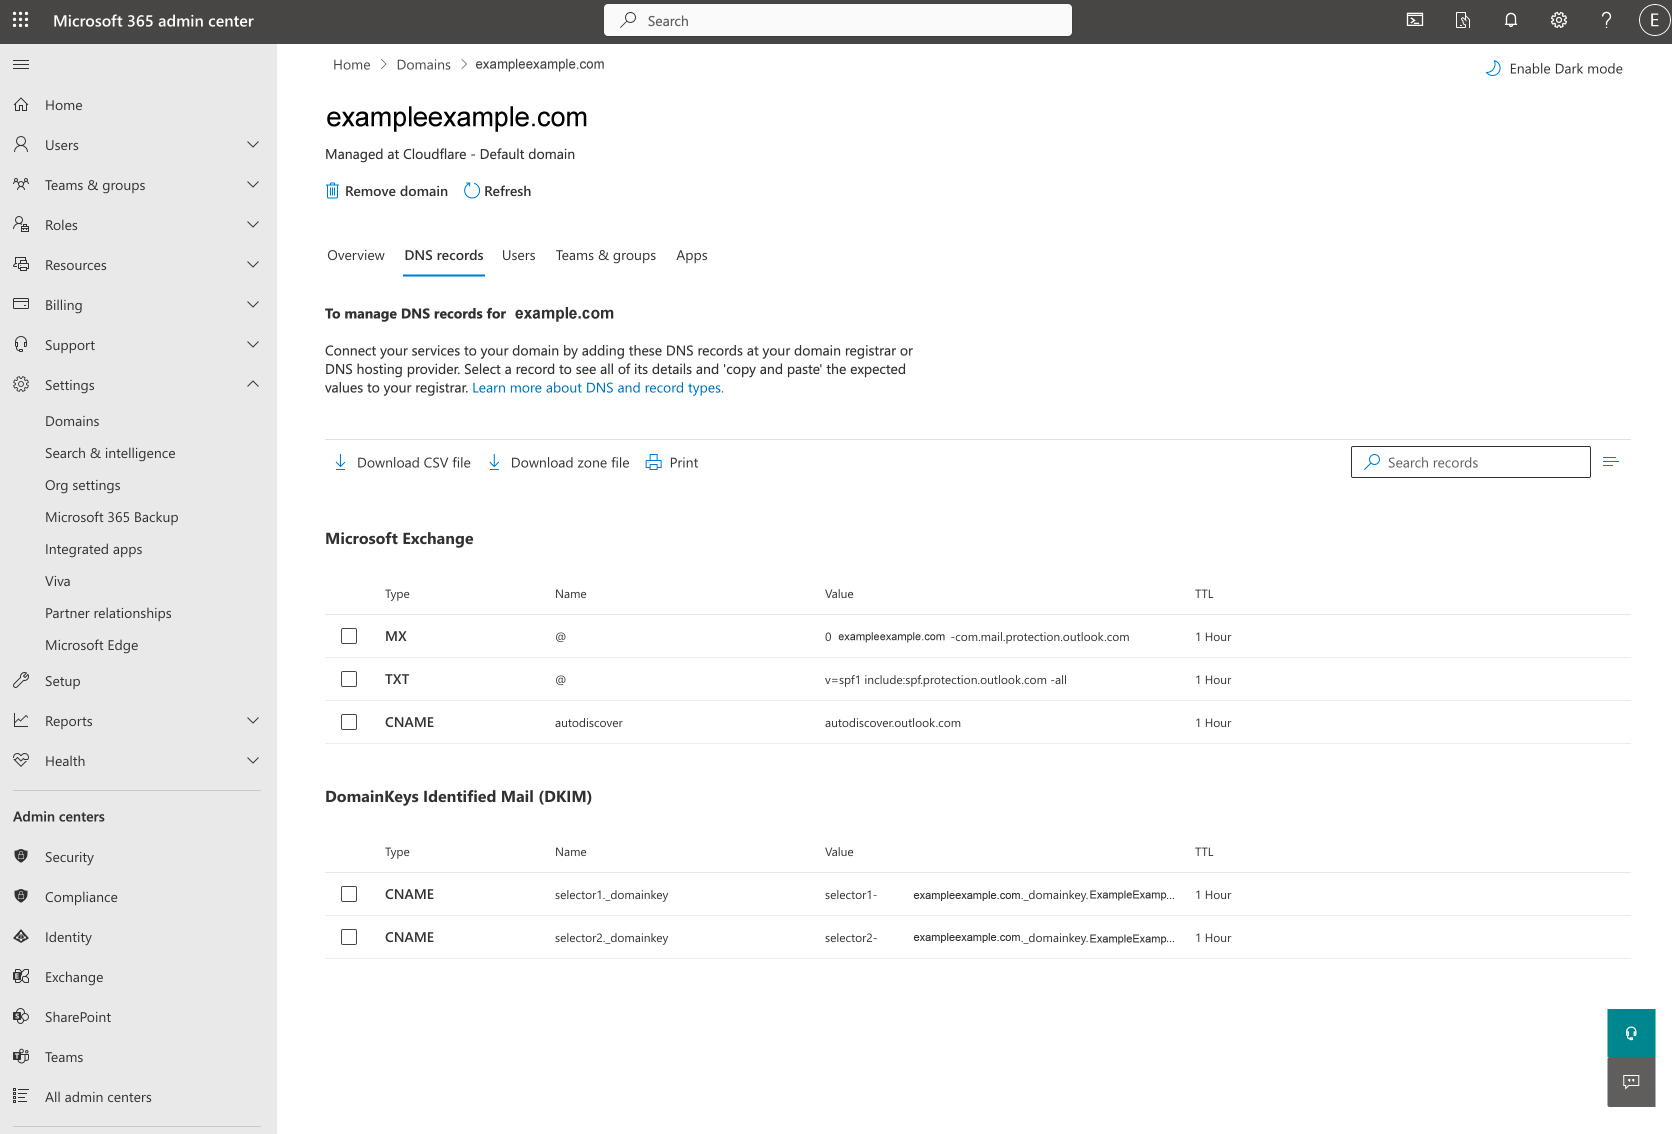
Microsoft 365
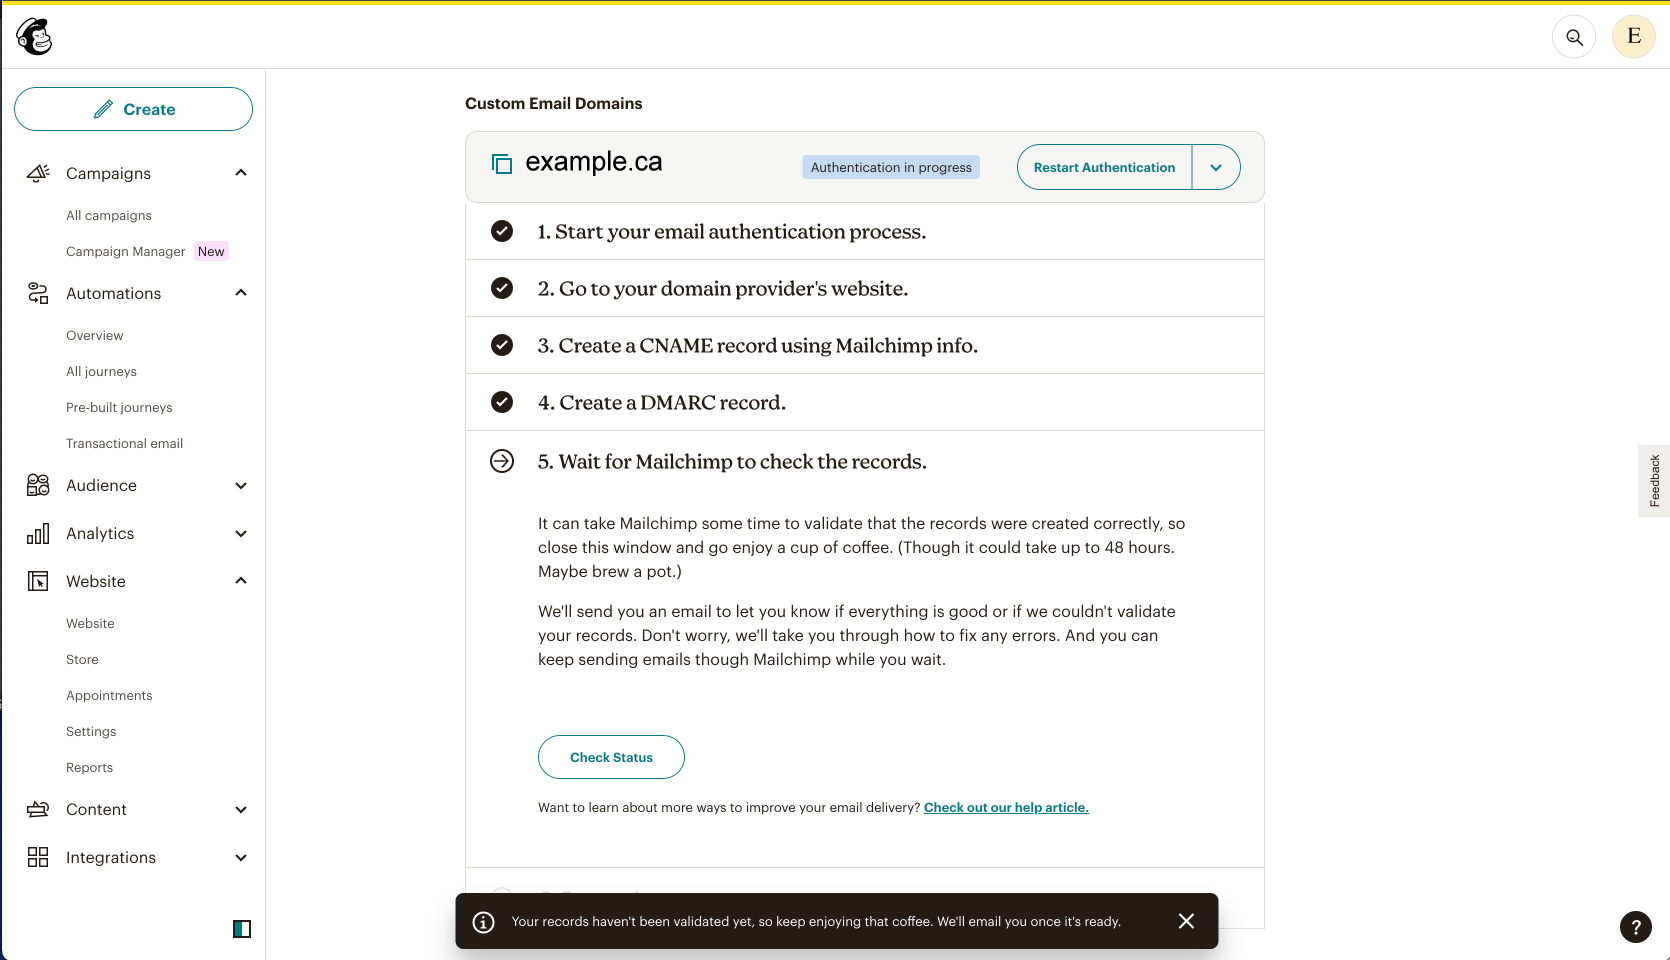
Mailchimp DMARC